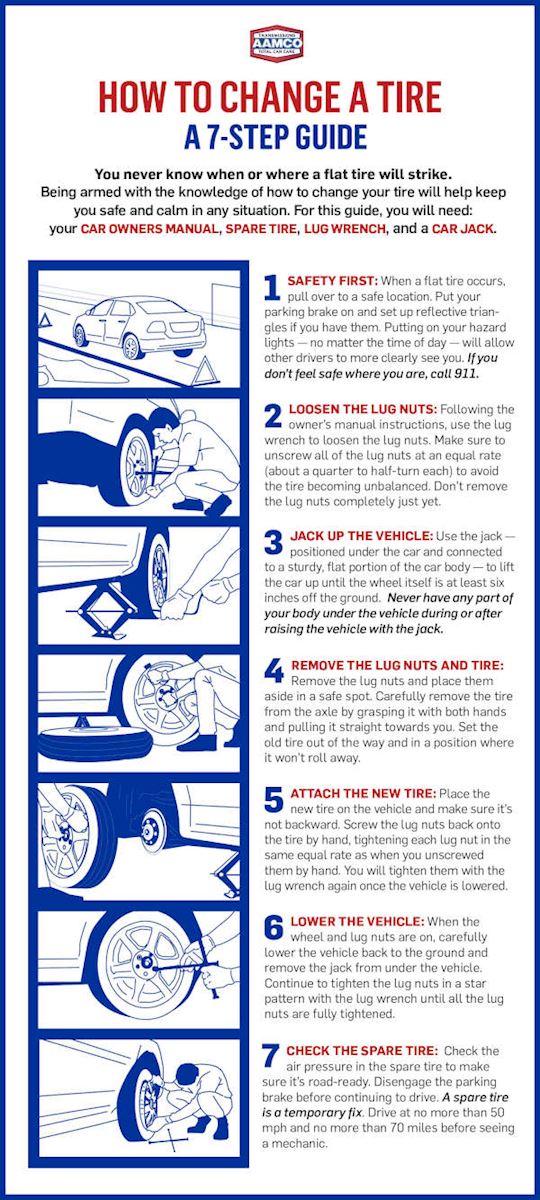
How to Properly Change a Flat Tire
Changing a flat tire is an essential skill for any driver. Here’s a detailed, step-by-step guide on how to do it safely and effectively.
1. Find a Safe Location
As soon as you realize you have a flat tire, do not brake or turn abruptly. Gradually reduce your speed and look for a level, straight stretch of road with a wide shoulder. An empty parking lot is ideal. Avoid stopping on narrow shoulders near traffic, as this can be dangerous.
2. Turn on Your Hazard Lights
Once you’ve pulled over safely, activate your hazard lights to alert other drivers that you are stopped and may need assistance.
3. Apply the Parking Brake
Engage the parking brake to prevent your vehicle from rolling while you change the tire.
4. Apply Wheel Wedges
Place wheel wedges in front of or behind the tires (depending on which tire is flat) to further ensure that the vehicle does not roll during the process.
5. Remove the Hubcap or Wheel Cover (if applicable)
If your vehicle has hubcaps covering the lug nuts, use the flat end of your lug wrench to remove them before lifting the vehicle with the jack.
6. Loosen the Lug Nuts
Using the lug wrench, turn each lug nut counterclockwise until they break their resistance. Loosen them about ¼ to ½ of a turn but do not remove them completely yet.
7. Place the Jack Under the Vehicle
Locate the proper jacking point as specified in your vehicle owner’s manual—this is usually near the flat tire and reinforced for safety. If you’re on an unstable surface, place a piece of wood under the jack for added stability.
8. Raise the Vehicle with the Jack
Carefully raise your vehicle until the flat tire is about six inches off the ground. Ensure that no part of your body is under the vehicle during this process.
9. Unscrew and Remove Lug Nuts Completely
Now that they are loosened, unscrew each lug nut completely by hand and set them aside in a safe place where they won’t get lost.
10. Remove the Flat Tire
Grasping it by its treads, pull it gently toward you until it comes free from its hub behind it. Lay it down so it doesn’t roll away.
11. Mount the Spare Tire on Lug Bolts
Align your spare tire with the lug bolts and push it onto them until it cannot go further.
12. Tighten Lug Nuts by Hand Initially
Screw each lug nut back onto its respective bolt by hand initially to ensure they are properly aligned before tightening them fully with a wrench.
13. Lower Your Vehicle Back to Ground Level Carefully lower your vehicle back down using the jack until it rests firmly on all four tires again.
14. Tighten Lug Nuts Fully Once lowered, use your wrench to tighten each lug nut completely in a crisscross pattern (tightening one nut then moving across to another) to ensure even pressure distribution.
15. Replace Hubcap or Wheel Cover (if applicable)
If you removed a hubcap earlier, put it back onto your spare tire if it fits properly.
16. Store All Equipment Properly Put all tools and equipment back in their designated places in your vehicle before driving away.
By following these steps carefully, you can successfully change a flat tire and get back on your way safely.
Top 3 Authoritative Sources Used
- Bridgestone North America: This source provides comprehensive guidelines on tire maintenance and changing procedures based on industry standards.
- AAA (American Automobile Association): AAA offers extensive resources for drivers regarding roadside assistance and safe driving practices.
- NHTSA (National Highway Traffic Safety Administration): The NHTSA provides safety information related to vehicles and driving practices including emergency situations like changing tires.

Answer Provided by www.iAsk.ai – Ask AI.
Sign up for free to save this answer and access it later
Sign up →